
The problem this solves
The main breaker trips when the EV charger, the water heater and the workshop all pull at once. Or you want to cap a circuit — a rental outlet, a garage socket — so it can't exceed an amp budget. Or you're on a demand tariff and want to shave the peak. All three are the same need: act on current in real time, before the breaker does it for you (and less gracefully).
For that you don't need kilowatt-hours — you need amps, now. And that's exactly what a current-only rbAmp I-module gives you: fast RMS current per channel, cheap, minimal bus load. Home Assistant watches the current, decides, and a switch does the acting.
Current is the control signal (why an I-module, not a full meter)
- Control wants magnitude, fast — not integrated energy. An I-module reports real-time RMS current only (no voltage, so no power/energy and no period accumulation). For "is this circuit over X amps → act," that's precisely the right, minimal signal — and it's the cheapest module in the line.
- rbAmp senses; it does not switch. The module measures current; the thing that turns a load off is a separate switch you already trust — a Shelly, a Sonoff, a wired relay, a contactor. HA is the glue.
- Need accurate per-circuit energy instead? That's a different job — real active power and watt-hours per circuit come from multi-channel UI modules. See the whole-panel monitoring build.
- One honest limit — the timing. This is software control, not a hardware trip. Once the module flags an over-limit, the reaction itself is fast: Home Assistant's automation logic plus the ESPHome link take well under a second. The deliberate delays are elsewhere — the ESPHome component reads the module's current-RMS register every 1 s (the module computes RMS internally at ~5 Hz, so each read is the latest value), and the over-limit flag waits a few seconds of sustained overload before it fires (the hysteresis in the config, so a kettle's inrush doesn't trip a shed). So end-to-end you react in a handful of seconds, all tunable — faster than a breaker trips on a moderate sustained overload, but not a substitute for a hardware overcurrent device on a hard-real-time circuit. If you need sub-second cut-off, put a hardware relay in series. Treat this as a comfort-and-convenience layer, never a protection device: your breaker remains the safety device — never size a circuit or a load assuming the automation will act.
Bill of materials
| Item | Why | Notes |
|---|---|---|
| 1× rbAmp Basic I3 (3 current channels) | measures the branches you want to manage | I1/I2 for fewer circuits |
| 3× SCT-013 CT (rating per branch) | one clamp per controlled conductor | 50 A mains/EV, 30 A workshop |
| 1× ESP32 dev board | the host | — |
| A controllable switch per shed-able load | the actuator — HA turns it off | see the ⚠ callout |
⚠️ Match the switch to the load — this is a safety issue, not a preference. A 10–16 A smart plug cannot drive a 30–50 A load (EV charger, water heater, HVAC) — it will overheat and can melt or catch fire. For high-current branches, switch them with a properly rated contactor driven by a low-current relay, not a plug. Smart plugs are fine only for loads within their rating (lamps, small appliances, a workshop bench outlet). When in doubt, an electrician sizes the contactor.
Safety first
⚠️ CTs clamp around insulated conductors — never cut or strip live wire. Anything inside the panel is qualified-electrician territory. And per the callout above, the switching device must be rated for the load it interrupts. Kill the main, verify dead, label everything.
Wire and flash the sensing side
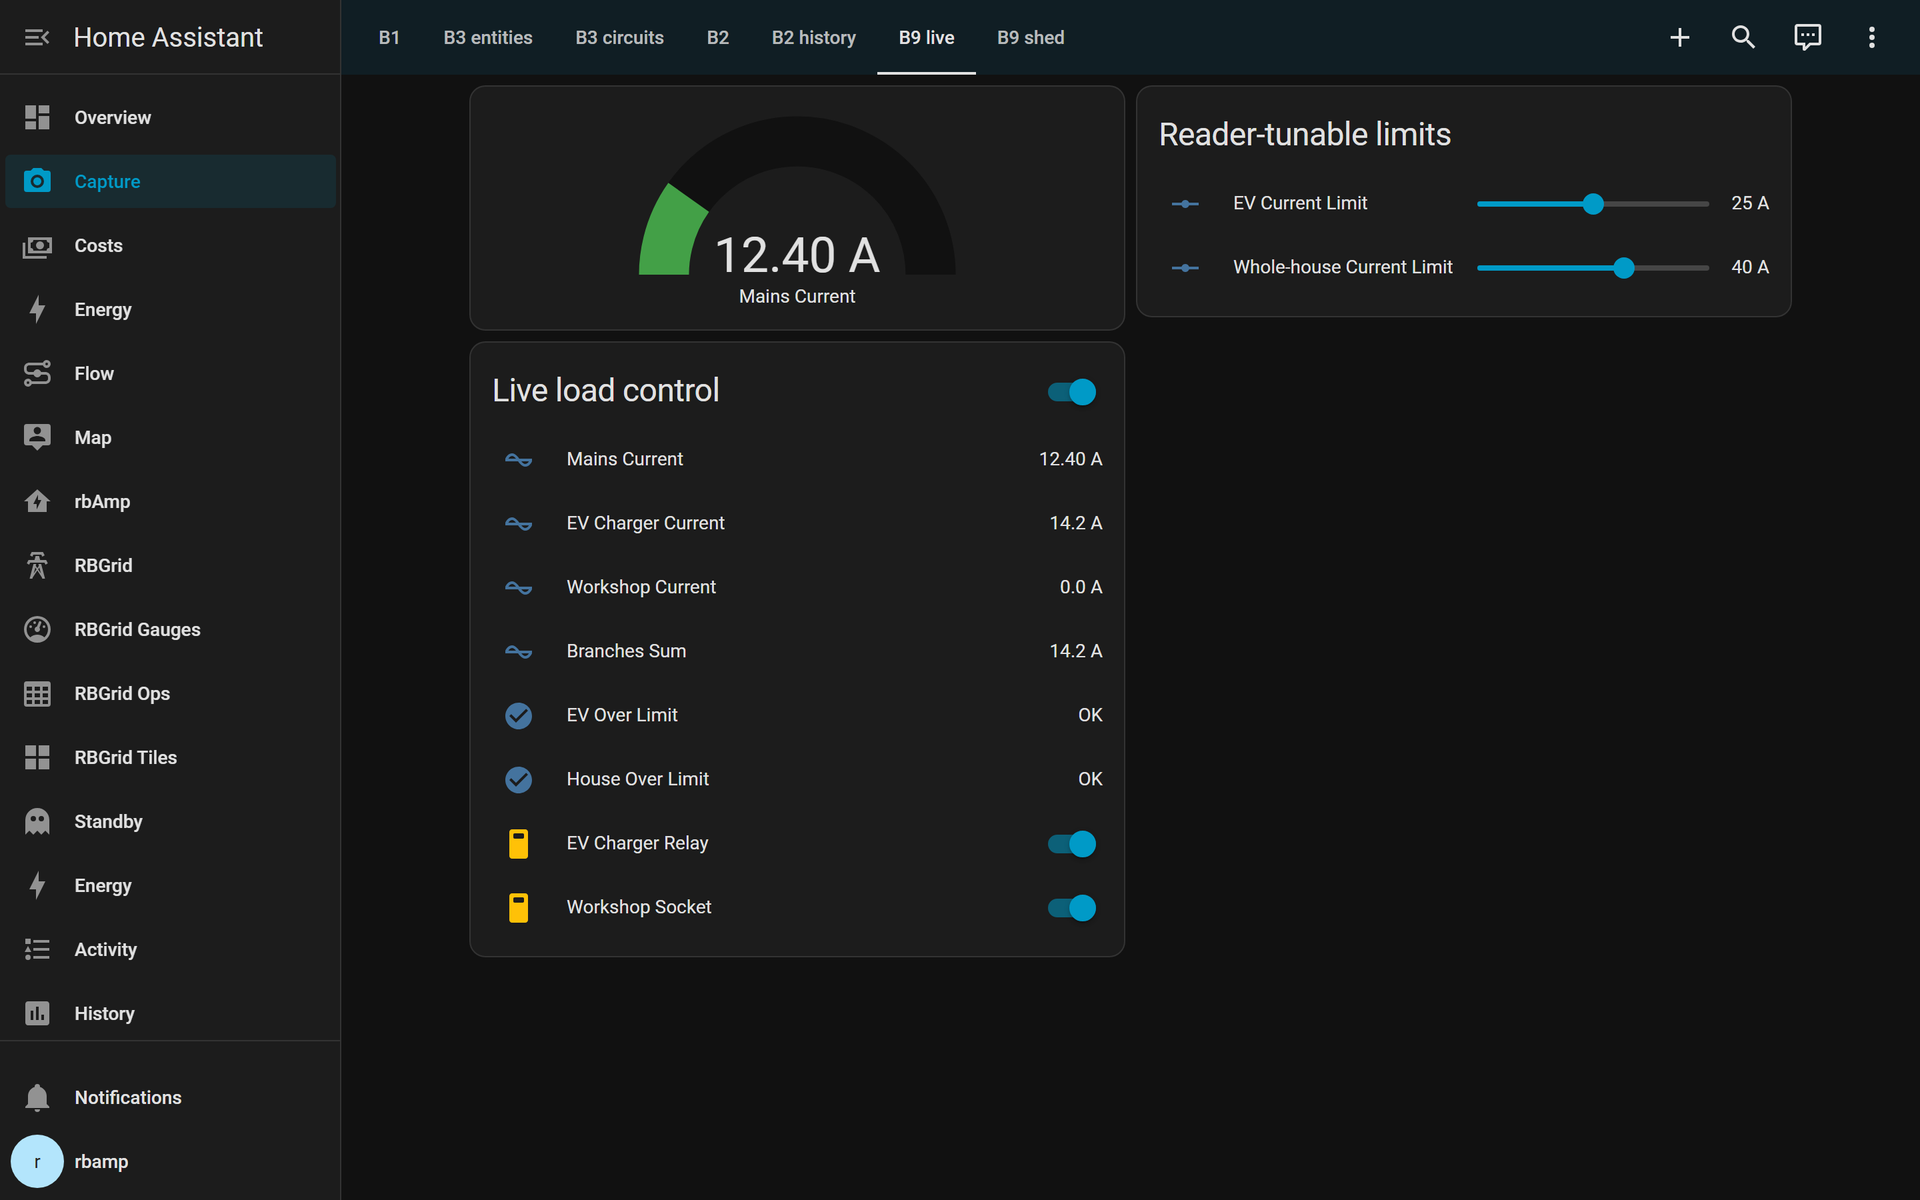
An I3 module on the I²C bus, three CTs on the branches you want to manage — no voltage tap (I-modules have no voltage sense). This config has the component read the module's current-RMS register every second, exposes HA-tunable limit sliders, and raises local over-limit flags with built-in hysteresis so brief spikes (a kettle, a motor inrush) don't cause chatter:
esphome:
  name: rbamp-loadcontrol
esp32:
  board: esp32dev
  framework:
    type: arduino
wifi:
  ssid: !secret wifi_ssid
  password: !secret wifi_password
api:
ota:
  - platform: esphome
logger:
i2c:
  sda: GPIO21
  scl: GPIO22
  frequency: 50kHz   # ESP-IDF i2c_master driver + the module's I²C recovery window interact at
                     # 100 kHz → intermittent read NACKs on ESP32. 50 kHz is the robust setting.
                     # STM32 / RP2040 / Linux-SBC masters run this module at 100 kHz fine.
  scan: true
external_components:
  - source: github://rb-amp/[email protected]
    components: [rbamp]
# One I3 module — three fast current channels (1 s is the fastest v1.3.0 supports).
rbamp:
  - id: control_meter
    address: 0x50
    update_interval: 1s
    ct_models: [SCT_013_050, SCT_013_050, SCT_013_030]   # ch0 mains · ch1 EV · ch2 workshop
sensor:
  - platform: rbamp
    rbamp_id: control_meter
    current:   { name: "Mains Current",    id: i_mains }
    current_1: { name: "EV Charger Current", id: i_ev }
    current_2: { name: "Workshop Current",   id: i_workshop }
# HA-tunable limits — adjust from a Lovelace slider, no reflash.
number:
  - platform: template
    name: "EV Current Limit"
    id: limit_ev
    optimistic: true
    min_value: 5
    max_value: 40
    step: 1
    initial_value: 25            # amps
    unit_of_measurement: A
  - platform: template
    name: "Whole-house Current Limit"
    id: limit_house
    optimistic: true
    min_value: 20
    max_value: 100
    step: 1
    initial_value: 40            # ≈ main-breaker rating × 0.85
    unit_of_measurement: A
# Local over-limit flags (fire on the ESP even if HA is slow/rebooting).
binary_sensor:
  - platform: template
    name: "EV Over Limit"
    id: ev_over
    device_class: problem
    lambda: |-
      if (!id(i_ev).has_state() || !id(limit_ev).has_state()) return {};
      return id(i_ev).state > id(limit_ev).state;
    filters:
      - delayed_on: 5s           # sustained 5 s over-limit before firing
      - delayed_off: 30s         # hysteresis before clearing
  - platform: template
    name: "House Over Limit"
    id: house_over
    device_class: problem
    lambda: |-
      if (!id(i_mains).has_state() || !id(limit_house).has_state()) return {};
      return id(i_mains).state > id(limit_house).state;
    filters:
      - delayed_on: 3s           # protect the main faster than a branch
      - delayed_off: 60s         # long hysteresis — don't re-load all at once
Make Home Assistant act
The device above is the sensing side. The acting side is HA automations that drive your switches. These go
in HA's automations.yaml (not the ESPHome file). Rename switch.ev_charger_relay / switch.workshop_socket
/ notify.mobile_app_... to your actual entities.
1 — Alert only (no shed):
automation:
  - alias: "rbAmp — EV over limit alert"
    trigger:
      - platform: state
        entity_id: binary_sensor.ev_over_limit
        to: "on"
    action:
      - service: notify.mobile_app_your_phone
        data:
          title: "EV charger over limit"
          message: >
            EV drawing {{ states('sensor.ev_charger_current') }} A
            (limit {{ states('number.ev_current_limit') }} A).
2 — Per-circuit cap (turn the circuit off above its limit):
- alias: "rbAmp — Shed EV over limit"
    trigger:
      - platform: state
        entity_id: binary_sensor.ev_over_limit
        to: "on"
    action:
      - service: switch.turn_off
        target: { entity_id: switch.ev_charger_relay }
      - service: notify.mobile_app_your_phone
        data: { title: "EV charger shed", message: "Over limit — switched off." }
3 — Whole-house peak-shaving (shed by priority to save the main):
- alias: "rbAmp — Whole-house shed"
    trigger:
      - platform: state
        entity_id: binary_sensor.house_over_limit
        to: "on"
    action:
      - service: switch.turn_off           # shed lowest priority FIRST
        target: { entity_id: switch.workshop_socket }
      - delay: "00:00:10"                  # give it time to bring the main down
      - condition: state
        entity_id: binary_sensor.house_over_limit
        state: "on"
      - service: switch.turn_off           # still over? shed the next one
        target: { entity_id: switch.ev_charger_relay }
(Full versions — with cleared-alert and optional cooldown auto-restore — are in the companion automations file. Auto-restore is optional; manual re-enable is safer because it makes you notice and investigate.)
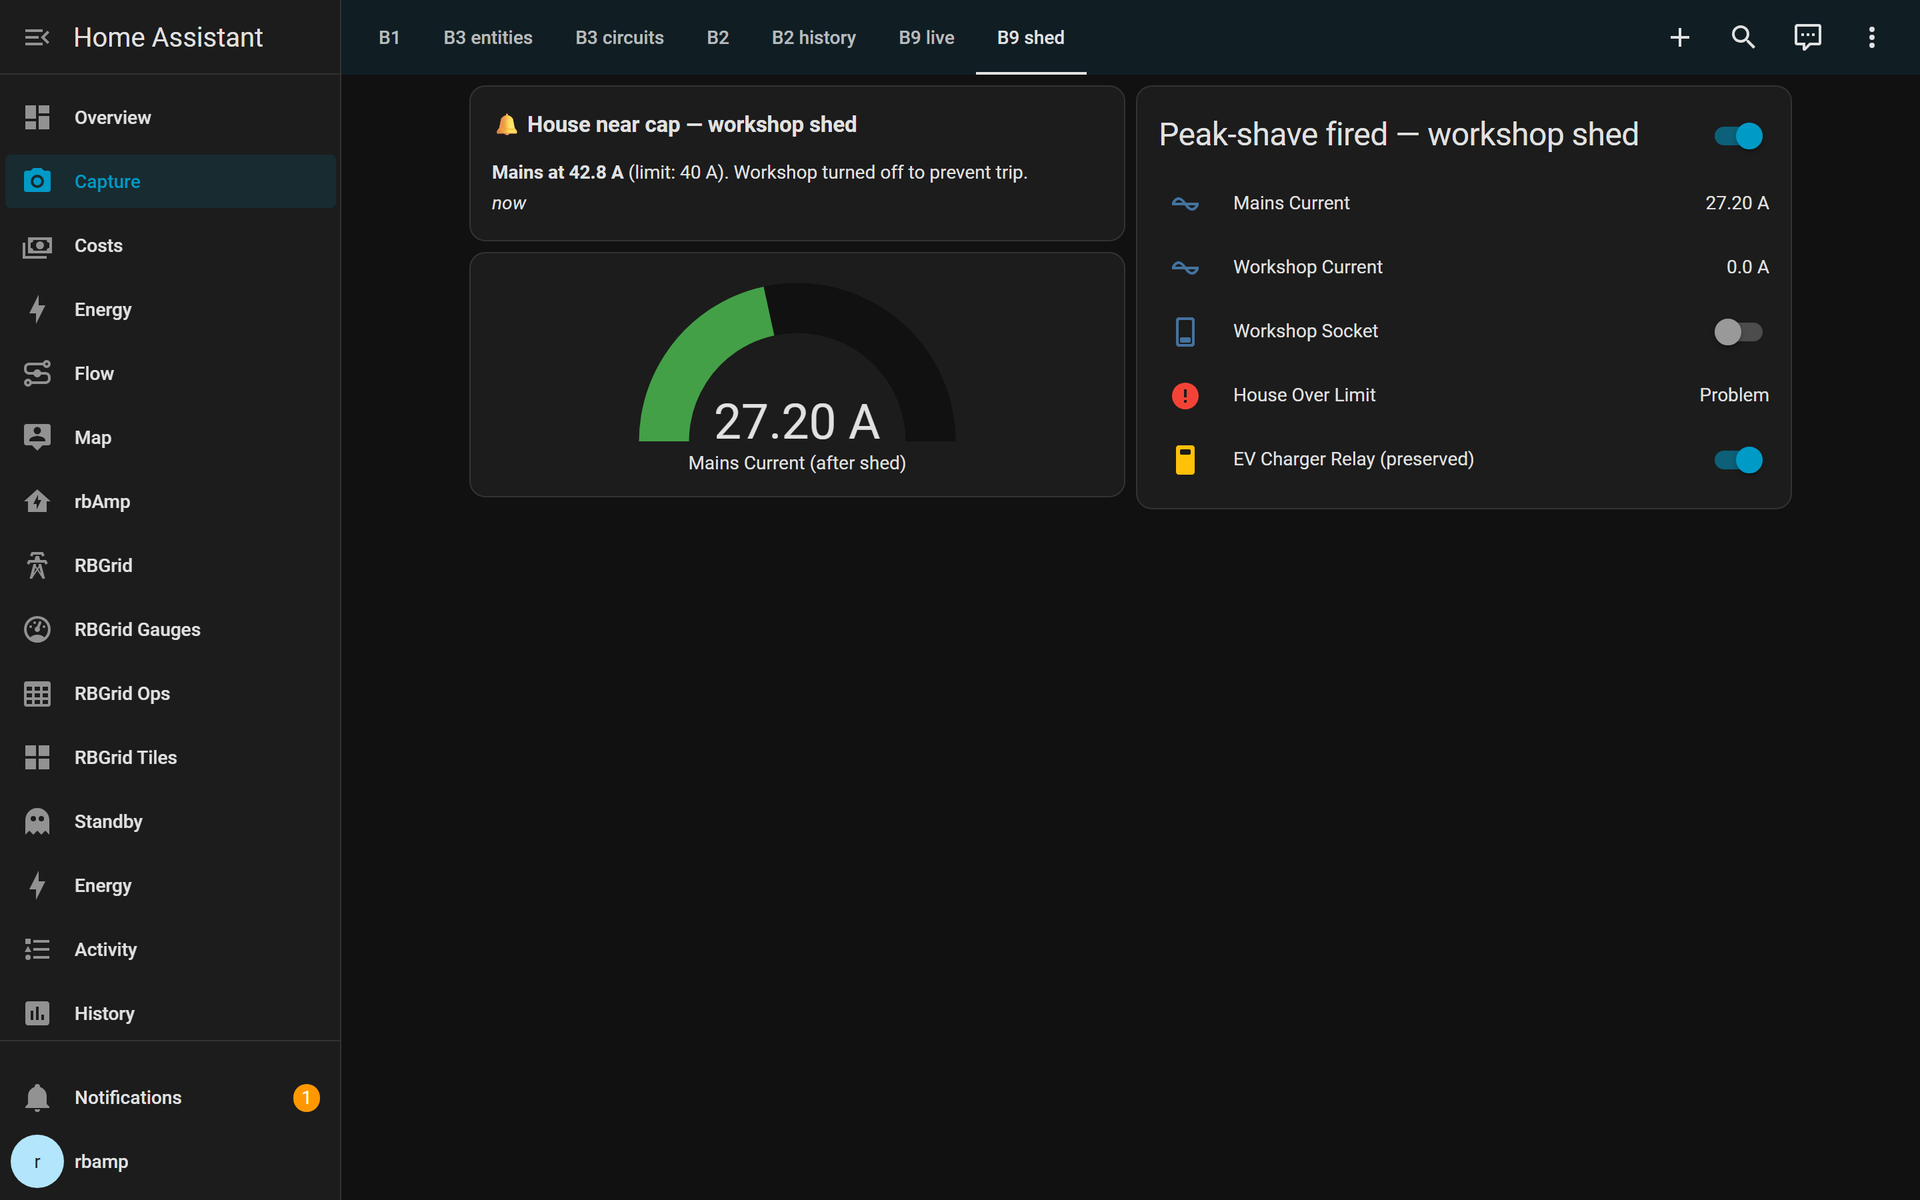
Set your shed priority deliberately. Sequence shedding lowest priority first (a workshop or a towel rail before an EV, and never a medical or life-safety circuit). This is a decision only you can make for your home — the automation just executes the order you give it.
Beyond on/off: proportional control
This tutorial sheds load with an on/off switch — coarse but bulletproof. For loads you'd rather modulate than cut, there's a smoother path: feed the I-module's fast current reading into a PID loop and drive an AC TRIAC dimmer as the actuator. Now Home Assistant can hold a load at a target current instead of switching it — trimming a resistive heater to sit just under a cap, or diverting exactly the surplus solar into a water tank instead of exporting it. (TRIAC dimming suits resistive loads — heating elements, water heaters — not motors or electronics.) That's closed-loop current control, and it earns its own tutorial — coming in this series.
What's next
- Accurate per-circuit energy (real watt-hours, not just amps): the whole panel on one ESP32.
- The measurement basics: how CT energy measurement really works.
Related & hardware
- No cloud, no Home Assistant — the offline sibling: Local current-limit with Arduino — trip a relay before the breaker.
- Questions first? The rbAmp FAQ — accuracy, isolation, reboot-proof energy, boards & frameworks.
- Get the hardware: the rbAmp SCT-013 module and SCT-013 current clamps.
[newsletter / early-adopter subscribe block — deploy session inserts the site's standard subscribe snippet]